
-
Research Services<a class="dhimg1" href="/shichangdetail1/9.html" target="_self" rel="nofollow"> <img src="https://omo-oss-image.thefastimg.com/portal-saas/pg2026042316544414203/cms/image/8926ff01-64bc-4928-a995-396bdb9d8102.jpg" alt="Aniphe BioLab"> </a> <a class="dhimg2" href="/shichangdetail/8.html" target="_self" rel="nofollow"> <img src="https://omo-oss-image.thefastimg.com/portal-saas/pg2026042316544414203/cms/image/26342b34-4f1e-4d28-9166-7b685e6d70c3.jpg" alt="Aniphe BioLab"> </a>


-
Preclinical CRO<a class="dhimg1" href="/shichangdetail/6.html" target="_self" rel="nofollow"> <img src="https://omo-oss-image.thefastimg.com/portal-saas/pg2026042316544414203/cms/image/cc43bac1-07d9-4340-9677-fbe01c51330a.jpg" alt="Aniphe BioLab"> </a> <a class="dhimg2" href="/shichangdetail/10.html" rel="nofollow" target="_self"> <img src="https://omo-oss-image.thefastimg.com/portal-saas/pg2026042316544414203/cms/image/f1d8f739-0d36-4cb8-adeb-26de791d909c.jpg" alt="Aniphe BioLab"> </a>


-
-
-
-


Latest News
Focusing on cutting-edge technologies and research advancements,
sharing Aniphe BioLab’s achievements in scientific innovation,
Professional insights
and practical experience in the fields of laboratory animals and preclinical research.
Publish an article
Precise targeting! In situ injection of AAV vectors into mouse kidneys enables “point‑and‑shoot” gene editing in adults!
As the central organ of the urinary system, the kidney comprises a complex functional unit composed of more than 20 distinct cell types, including the renal corpuscle—containing endothelial cells, podocytes, and mesangial cells—and the renal tubule, which is predominantly lined by epithelial cells. Its unique physiological barriers, such as the glomerular basement membrane with slit pores only 10 nm in diameter, render systemic administration of adeno‑associated viruses (AAVs) poorly effective; approximately 90% of viral particles are sequestered by the liver, resulting in suboptimal renal targeting efficiency.
Therefore, selecting the appropriate serotype, tissue-specific promoter, and injection method for different tissues and cell types can effectively enhance AAV infection efficiency.
Kidney—AAV Injection Guidelines
| Suitable of the serotype
AAV serotypes 8 and 9 both exhibit robust transduction efficiency across various renal cell types, with AAV9 being the predominant serotype.
| Specific promoter
You can choose the ubiquitous CMV promoter, or select cell‑specific promoters to achieve optimal transduction efficiency; for example, Nphs1 and Nphs2 are suitable for transducing renal podocytes, while Ksp‑cadherin and SGLT2 can be used for renal tubular epithelial cells.
| Injection method:
Systemic administration (tail vein injection) results in poor renal infection; therefore, we can employ various localized renal injection techniques—such as renal artery injection, retrograde renal vein injection, retrograde ureteral injection, renal parenchymal injection, and renal pelvis injection—to enhance the efficiency of viral infection.

Figure 1. Methods for local renal injection. A. Renal artery injection; B. Retrograde renal vein injection; C. Retrograde ureteral injection; D. Renal parenchymal injection: Depending on the needle insertion depth, the injection is administered into either the renal cortex or medulla. Source: Rubin, J.D. and M.A. Barry. Mol Diagn Ther, 2020.
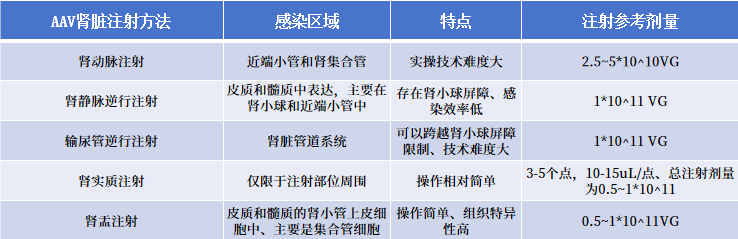
Table 1. Summary of Infection Range and Viral Dose for Different Renal Injection Methods
① Renal artery injection
Experimental materials:
① Surgical instruments: hair‑removal razor, surgical drape, straight‑tip forceps, curved‑tip forceps, surgical scissors, insulin syringe, 5‑0 absorbable suture needle, cotton swab sticks, 70% alcohol swabs, gelatin sponge, tissue adhesive
② Reagents: PBS, saline, anesthetic, povidone‑iodine.
1. Remove the anesthetized rat and place it on a surgical drape. Wipe the skin over the renal region with povidone‑iodine; once the iodine has been absorbed, remove the povidone‑iodine with a 70% ethanol‑soaked cotton ball.
2. Make a 2–3 cm incision in the renal region; carefully dissect the skin of the rat and separate it to expose the muscle layer.
3. Use a cotton swab to gently press against the organ, exposing the kidney and its surrounding vessels. Dissect the renal artery, clamp its distal end with a vascular clamp, and use curved forceps to carefully extract the vessel. Then, insert an insulin syringe into the vessel and inject approximately 50 microliters.
4. After completing the injection, while withdrawing the needle, apply the prepared gelatin sponge to the site of the vascular rupture and secure it with tissue adhesive. Then remove the hemostatic clamp, withdraw the cotton swab that was pressing against the organ, and proceed with suturing.
Key operational points:
01 Ensure precise puncture of the aorta and advance the catheter to the renal arteries; improper puncture may damage the renal arterial wall—resulting in vessel rupture or the formation of microaneurysms—and lead to extravasation of the viral vector into surrounding tissues, thereby reducing the efficiency of targeted delivery.
② Renal venous injection
Experimental materials:
① Surgical instruments: hair‑removal razor, surgical drape, straight‑tip forceps, curved‑tip forceps, surgical scissors, insulin syringe, 5‑0 absorbable suture needle, cotton swab sticks, 70% alcohol swabs, gelatin sponge, tissue adhesive.
② Reagents: PBS, saline, anesthetic, povidone‑iodine.
Surgical Procedure:
1. Following adaptive feeding, the rats were anesthetized and placed in a supine position, secured on the surgical table; after prepping the abdominal area, the skin was routinely disinfected.
2. Make a 2–3 cm incision in the renal region; carefully dissect the skin of the rat and separate it to expose the muscle layer.
3. Use a cotton swab to gently press against the organ, exposing the kidney and its surrounding vessels. Dissect the renal artery, clamp its distal end with a vascular clamp, and use curved forceps to carefully extract the vessel. Then, insert an insulin syringe into the vessel and inject approximately 50 microliters.
4. After completing the injection, while withdrawing the needle, apply the prepared gelatin sponge to the site of the vascular rupture and secure it with tissue adhesive. Then remove the hemostatic clamp, withdraw the cotton swab that was pressing against the organ, and proceed with suturing.
Key operational points:
③ Renal parenchymal injection
Experimental materials:
① Surgical instruments: razor, surgical drape, straight forceps, curved forceps, surgical scissors, 5-0 absorbable suture needle, cotton swab applicator, 70% alcohol swabs, insulin syringe or 30G needle.
② Reagents: PBS, saline, anesthetic, povidone‑iodine.
1. Remove the anesthetized mouse and place it on a surgical drape. Wipe the skin over the renal region with povidone‑iodine; once the iodine has been absorbed, remove the povidone‑iodine with a 70% ethanol‑soaked cotton ball.
2. Use forceps to lift the skin on the left side, then make an approximately 1-cm incision in the disinfected area with surgical scissors, and carefully dissect the skin to expose the muscular layer. Gently squeeze out the kidney using your thumb and index finger, and gently retract the adipose tissue surrounding the renal region.
3. After exposing the kidney, cover its surface with a PBS-soaked gauze to maintain moisture.
4. Insert the syringe fitted with a 30‑gauge needle into the renal parenchyma and inject approximately 2 µL; the typical injection depth is about 2–3 mm. After completing the injection, withdraw the syringe, apply gentle pressure with a cotton swab for 2–3 minutes, and once bleeding has ceased, return the kidney to the abdominal cavity (or seal the incision with tissue adhesive). Finally, close the muscle layer and the skin with sutures.
Key operational points:
④ Intrarenal injection
Experimental materials:
① Surgical instruments: razor, surgical drape, straight forceps, curved forceps, surgical scissors, 5-0 absorbable suture needle, cotton swab applicator, 70% alcohol swabs, insulin syringe or 30G needle.
② Reagents: PBS, saline, anesthetic, povidone‑iodine.
Surgical Procedure:
1. Remove the anesthetized rat and place it on a surgical drape. Wipe the skin over the renal region with povidone‑iodine; once the iodine has been absorbed, remove the povidone‑iodine with a 70% ethanol‑soaked cotton ball.
2. Use forceps to lift the skin on the left side, then make an approximately 1-cm incision in the disinfected area with surgical scissors, and carefully dissect the skin to expose the muscular layer. Gently squeeze out the kidney using your thumb and index finger, and gently retract the adipose tissue surrounding the renal region.
3. After exposing the kidney, cover its surface with a PBS-soaked gauze to maintain moisture.
4. Insert the syringe fitted with a 30‑gauge needle into the renal pelvis and inject approximately 50 µL; the typical injection depth is about 2–3 mm. After completing the injection, withdraw the syringe, apply gentle pressure with a cotton swab for 2–3 minutes, and once bleeding has ceased, return the tissue to the abdominal cavity (or seal the wound with tissue adhesive). Finally, close the muscle layer and the skin with sutures.
Key operational points:
⑤ Retrograde ureteral injection
Experimental materials:
① Surgical instruments: hair‑removal razor, surgical drape, straight‑tip forceps, curved‑tip forceps, surgical scissors, 5‑0 absorbable suture needle, cotton swab applicators, 70% alcohol swabs, insulin syringe or a 30G needle (or a 32G needle).
② Reagents: PBS, saline, anesthetic, povidone‑iodine.
1. Remove the anesthetized rat and place it on a surgical drape. Wipe the skin of the rat’s lower abdomen with povidone‑iodine; once the iodine has been absorbed, remove the povidone‑iodine with a 70% ethanol‑soaked cotton ball.
2. Surgical incision: Under anesthesia, an abdominal incision is made to expose the abdominal cavity.
3. Identify the ureter: Carefully retract the intestinal tract, identify and expose the right or left ureter, and use a cotton swab or forceps to remove any adipose tissue or other surrounding structures from the ureter.
4. Ureteral Injection: At the selected distal ureter, apply a hemostatic clip; use curved forceps to grasp the ureter, then insert a syringe fitted with a 30G needle into the ureter for injection (approximately 20–30 μL).
5. After completing the injection, withdraw the syringe and use another hemostatic clamp to occlude the site above the incision. After 5 minutes, remove the vascular clamps at both ends, and return the ureter to the abdominal cavity. Finally, suture the muscle layer and the skin with absorbable sutures.
Key operational points:
Aniphe BioLab Inc.
Address:
Runcheng, No. 8 Longtai Road, Jiangbei New Area, Nanjing City, Jiangsu Province
Building 8, Science Park
Postal Code: 210007
Phone:025-8520 8061
Email:info@aniphebio.com(Consultation)
Email:order@aniphebio.com(Order)


WeChat Official Account
Video Account
 Su Public Security Bureau Internet Information Service Filing No. 32010402001421